
Knowing how to screen record on Mac is a handy skill, whether you’re creating a tutorial, saving a webinar, or sharing gameplay. Although recording the screen is straightforward, however, many users find it challenging to capture audio from their microphone or system.
This guide will show you four effective methods to perfectly screen record on Mac with audio, from built-in features to professional software.
Quick Comparison of Mac Screen Recording Options
| Method | Audio Support | Resolution / FPS | Best For |
| 1. QuickTime Player | Microphone only | Up to 4K / 30 FPS | Basic recordings with voice narration |
| 2. Bandicam | Microphone + System Audio | Up to 5K / 60 FPS | High-quality long recordings, gameplay, webinars, and professional content |
| 3. Camtasia | Microphone + System Audio | Up to 4K / 60 FPS | Creating and editing professional tutorials or presentations |
| 4. Apowersoft Online Screen Recorder | Microphone + System Audio | Up to 1080p / 30 FPS | No-install screen recording from a browser |
1. QuickTime Player (Built-In Option)
QuickTime Player is Apple’s built-in media player that also offers a simple screen recording feature. While it’s free and easy to use, it has some limitations when it comes to audio recording.
Step 1. Open QuickTime Player, then go to File > New Screen Recording.
- You can also open the recording tool by pressing Command + Shift + 5.

Step 2. Click the dropdown arrow next to the Record button, and select your microphone to record your voice or external audio.

Step 3. Start recording by clicking the Record button.
- Stop the recording from the menu bar and save your file.

Limitations: QuickTime can’t directly capture your system audio without third-party extensions. This means it’s best suited for simple recordings with an external microphone.
2. Bandicam Screen Recorder for Mac
If you need professional results, Bandicam is a top-tier screen recorder for Mac that allows you to screen record on Mac with audio — both system audio and microphone — without complicated setups. This is perfect for content creators, gamers, educators, and business professionals.
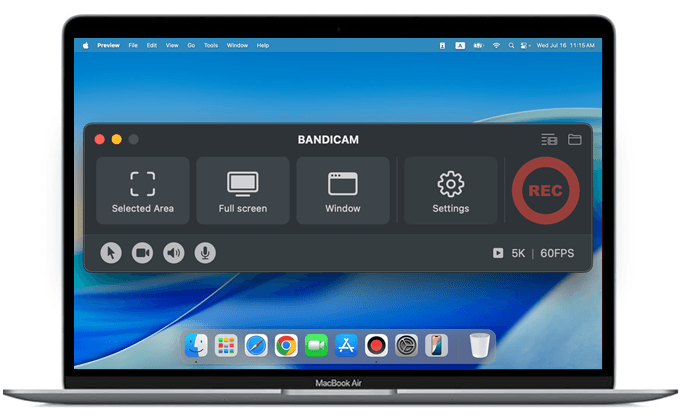
Key Features:
- Record both internal system audio and the microphone
- Capture in high resolution (up to 5K) with smooth 60 FPS
- Add a webcam overlay for tutorials or presentations
- Supports built-in video trimming
Follow these steps to screen record with audio on Mac:
- Download and install Bandicam for Mac.
- Select your recording mode (Selected Area, Full Screen, or Window).
The internal audio recording option is enabled by default. To record your voice, click on the microphone icon.

- Click ● REC to start recording.
- Click the Stop button to save your recording, then trim or share the video as you need.

With Bandicam, learning how to screen record on Mac becomes straightforward, and you’ll never have to worry about poor audio quality.
3. Camtasia
Camtasia is a premium screen recorder for Mac that not only lets you screen record on Mac with audio but also provides a full-featured video editor. It’s excellent for creating professional tutorials, presentations, and marketing videos.

Steps:
- Download and install Camtasia for Mac.
- Open the app and select New Recording.
- Choose whether to record your entire screen or a specific region.
- Enable both the microphone and system audio.
- Click the Start Recording button.
- After stopping the recording, use Camtasia’s built-in editor to trim, add effects, and export your video.
Best for: Users seeking an all-in-one solution to record and edit videos without the need for separate software.
4. Apowersoft Online Screen Recorder
If you prefer not to install additional software, Apowersoft Online Screen Recorder is a browser-based tool that lets you record your Mac screen with audio directly from the web. It works for both system and microphone audio, making it convenient for quick recordings.
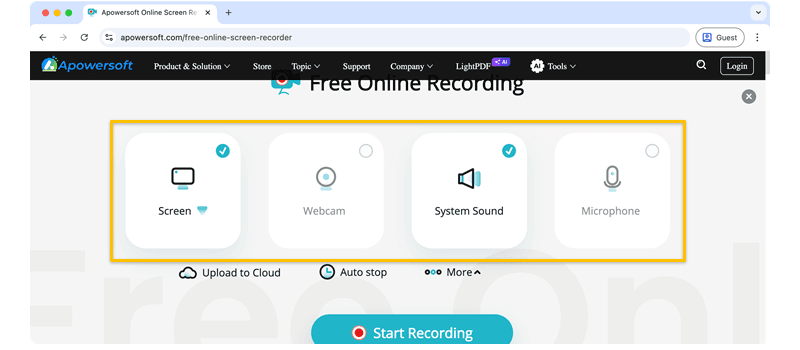
Steps:
- Visit Apowersoft Online Screen Recorder in your browser.
- Click Start Recording.
- Select your recording area — full screen or custom region.
- Enable system sound, microphone, or both.
- Click REC to start recording and stop when done.
- Save your recording locally or upload it to the cloud.
Best for: Quick, no-install recordings when you need a simple online tool.
Frequently Asked Questions (FAQ)
By default, macOS does not record internal audio. To capture system sound, you need a third-party tool like Bandicam or Camtasia, which supports both microphone and system audio recording.
If you want professional quality, Bandicam offers high resolution (up to 5K/60 FPS), long recording times, and system audio capture. For free built-in options, QuickTime Player works but has audio limitations.
Conclusion
Knowing how to screen record on Mac with clear audio is a valuable skill for anyone creating videos, presentations, or tutorials. While macOS offers basic options through QuickTime and the Screenshot Toolbar, advanced tools like Bandicam and Camtasia provide professional features for better quality and flexibility.

