How to Record Screen and Face on Mac

For Mac users looking to create tutorials, gaming content, or presentations, recording both your screen and face simultaneously is often essential. Whether it’s to capture on-screen content or reactions, creators need a simple, reliable solution. Bandicam for Mac streamlines this process, allowing for high-quality screen and camera recording.
In this guide, you’ll learn step-by-step how to use Bandicam to record your screen and face, and how to enhance your camera screen using macOS’s built-in camera background effects for a clean, professional look.
How to Record Your Screen with Camera on Mac
-
Download Bandicam Mac Screen Recorder and start it.
Click the 'Bandicam Free Download' button below to open the App Store. Then click 'Get' and then 'Install.'
-
Click the webcam overlay icon and choose a recording mode: Selected Area or Full screen.
![enable webcam overlay option]()
-
Drag the edges or move your camera display using your mouse to adjust the webcam.
![record screen and face]()
Additional Tip: Apply the camera effects.
- macOS 15 Sequoia now includes system-wide camera background effects for all Apple silicon Macs.
- While your camera screen is active, click the camera icon in the top menu bar and select your desired effects, like studio lighting or a background.
![record screen with camera on Mac]()
Bandicam will record your camera feed with these effects applied, giving your screen and webcam a professional appearance.
-
You can enable or disable the system audio and microphone as needed.

-
Start recording by clicking the ● REC button.
-
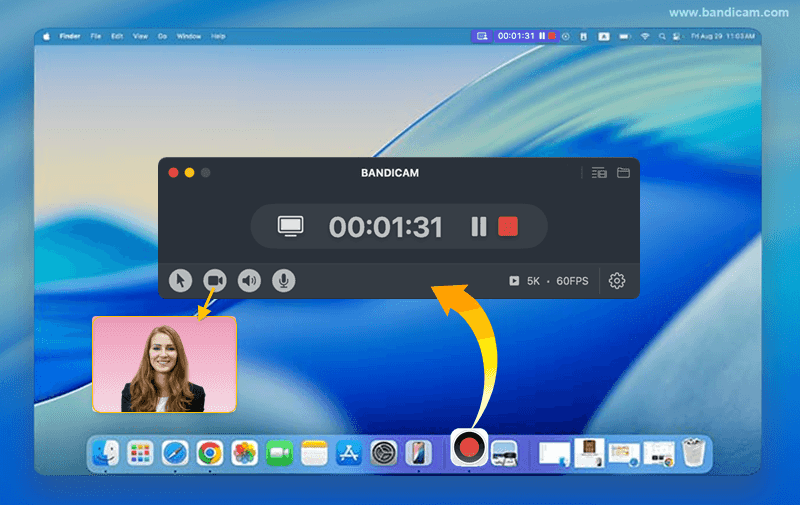
Toggle your webcam, audio, or microphone on and off while recording.
During the recording, you have the option to turn your webcam display, system audio, or microphone on and off by clicking the respective icons.
![record screen and face]()
-
To pause or resume the recording, click the ❚❚ pause button. To finish, press the ■ Stop button.
These controls can be found in your Mac's top menu bar or by returning to the Bandicam window and clicking the corresponding Pause/Stop button.
![pause/stop recording the full screen on mac]()
-
Stop recording and review the recorded video file.
Upon completing the recording, the Output Video List window will automatically appear.
- Manage Videos: Select a video and utilize the icons at the bottom to "Open in Finder," "Delete," "Send via AirDrop," or "Share."
- Trim Videos: Click the "Trim Video" button to save only wanted sections.
![review recorded video]()


Last Updated on