With technological innovation after innovation, we are capable of capturing any moment in our lives. In particular, screen and audio recorders enable us to save and look back on the smallest details from college lectures, memories from captured videos, tunes from songwriting sessions, etc.
One such software is Audacity, which lets you record live audio and edit it per your preferences. But does it solve all of your recording needs, or is there an alternative software that can improve your audio recording experience while simultaneously capturing your screen?
In this article, we will guide you how to record audio with Audacity, pros and cons of the software, and Bandicam, an alternative to Audacity. The table below compares Bandicam with Audacity.
| Bandicam | Audacity | |
| Recording Audio or Voice | ○ | ○ |
| Recording both Computer Audio + Microphone | ○ | △ |
| Recording PC screen/Webcam | ○ | X |
| Editing Audio | X | ○ |
| User Interface | Easy | Complicated |
Audacity Audio Software
Audacity is a free (open source software) and easy-to-use multi-track audio recorder and editor for numerous operating systems like Windows, Mac, GNU/Linux, and more. Audacity users can capture live audio, record computer playback on Windows Vista and above, and even convert tapes and records into CDs or digital recordings.
Audacity is often used to edit WAV, MP2, AIFF, MP3, FLAC, and Ogg Vorbis sound files and supports multiple file formats like AC3, M4A/M4R (AAC), WMA, Opus, and more.
Using Audacity, you can cut, copy, splice, and mix sounds together. You can also use various effects to change the speed, tempo, and/or pitch of a recording.
How to Record Audio With Audacity on Your Windows PC
Audacity is an excellent cross-platform voice recorder that edits, records and downloads audio on your computer. Here’s how you can record audio with Audacity on Windows:
Step 1: Download Audacity software on your Windows PC.
Step 2: Open Audacity on your PC, and select Windows WASAPI in the Preferences settings.

Step 3: Click the Audio Setup button, and select the speakers or microphone as the Recording Device.
- To record computer sounds, select the speakers.
- To record your voice, select a microphone device.

Step 4: Click the red Record button at the top of the Audacity app screen.
While playing your audio, you will see the sound bars appear on your screen, indicating that your audio is being recorded.

Pros and Cons of Audacity
Pros
- Free of charge and clean platform
- Lightweight and relatively small app
- Users can record and edit audio
- Users can change the speed, pitch, and tempo of their recording
Cons
- Audacity has a difficult user interface
- It’s tricky to record both computer and microphone sounds: you must check the “Listen to this device” option on Windows to record both computer audio and voice. If you select this option, you’ll hear your voice through your headset or speaker, making it uncomfortable to record both computer and microphone sounds.
- It doesn’t tag MP3s effectively and limits the mixing capabilities.
- It does not let you publish or share your files. You can only export with Audacity.
Audacity is not the best option if you are looking for audio recording software. Instead, it is more suitable for editing recorded audio. Therefore, if you are looking for an audio or voice recorder, you should settle for Bandicam, an alternative to Audacity, for a more enriching screen and audio recording experience.
Best Free Alternative to Audacity: Bandicam

Bandicam works as an audio recorder and voice recorder, depending on your needs and preferences. For example, using its Audio-only recording mode, you can record the speaker (computer sound) or microphone without recording your computer screen.
Bandicam is also a lightweight, feature-rich screen recorder software that captures high-quality videos on your Windows PC. Using this software, you can record full screen or a selected part of your screen as you wish. Bandicam preserves the video quality of the original work and records your screen with a high compression ratio. Further, Bandicam users can record screens, games (at 4K UHD video with up to 480 FPS), and webcam.
Audio-Only Recording
Since Bandicam’s audio recording feature has no limitations, you can record your audio and voice nonstop for unlimited time without hassle.
Step 1: Download, install and open Bandicam from its official website.
Step 2: Start the software and select the Audio Only menu.

Step 3: Set the Bandicam sound settings as you wish. For example, to record only your computer sound choose Default Output Device under Speakers.

Step 4: Press the red REC button to start the audio recording. Alternatively, you can press the F12 hotkey to start or stop the audio recording.

Step 5: Select the folder icon or visit the Home menu, and choose Audios to view the captured MP3 audio files.

Screen and Audio Recording
Bandicam is a great screen and audio recorder that effectively records everything on your computer screen with audio narration and PC sound. To record your screen with sound using Bandicam, follow these simple steps:
Step 1: Start Bandicam and choose a recording mode.

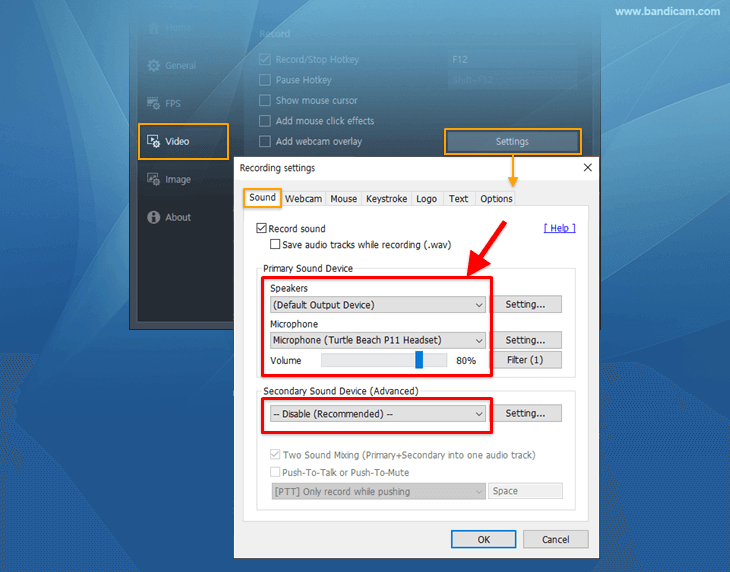
Step 2: Set the Bandicam sound settings as you wish.
To record both your computer sound and voice, select “(Default Output Device)” for the Speakers and “Your microphone device” for the Microphone.
Step 3: Click the REC button or press the F12 shortcut key to start or stop the recording.
Step 4: After finishing the recording, you can check or preview your recorded video.
Additional Tip: How to Record Computer and Microphone Sounds Separately
You may find yourself wanting to record computer and microphone sounds separately. If you uncheck the “Two Sound Mixing” option in the Bandicam Recording settings, a video with two audio tracks will be created. Details can be found on this Two Sound Mixing tutorial page.
Conclusion
Audacity is an open-source cross-platform that lets you manipulate and edit your recordings as you wish. It is undoubtedly an impressive software for recording and editing live audio. However, with certain limitations of Audacity, you might be searching for an alternative: Bandicam. Despite being lightweight software, Bandicam’s enriching features serve you with uncompromised and seamless screen and audio recordings.

