If you want to add subtitles to a video on Mac, the easiest way is to generate them automatically, review the text, and save the result in the format you need. With Bandicam for Mac, you can create subtitles from video audio, edit the transcript, save it as an SRT or TXT file, or export a subtitled video.
Why add subtitles to a video?
Subtitles make videos easier to follow and easier to reuse. They help viewers understand spoken content more clearly, especially in meetings, tutorials, interviews, and lectures. They also make it easier to review recordings later or turn spoken content into text for notes, summaries, or documentation.
How to Add Subtitles to a Video on Mac
Adding subtitles to a video on Mac is simple. With Bandicam for Mac, you can record a video, generate subtitles automatically, review and edit the text, and save the result in the format you need.
- Start Bandicam Mac screen recorder.
Install Bandicam for Mac from the Mac App Store and launch the app.
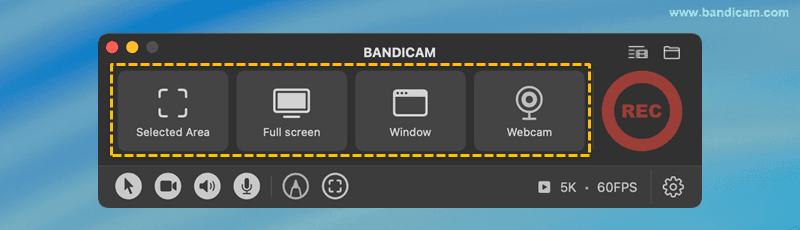
- Record your video.
Record your screen, app window, or webcam with Bandicam for Mac.
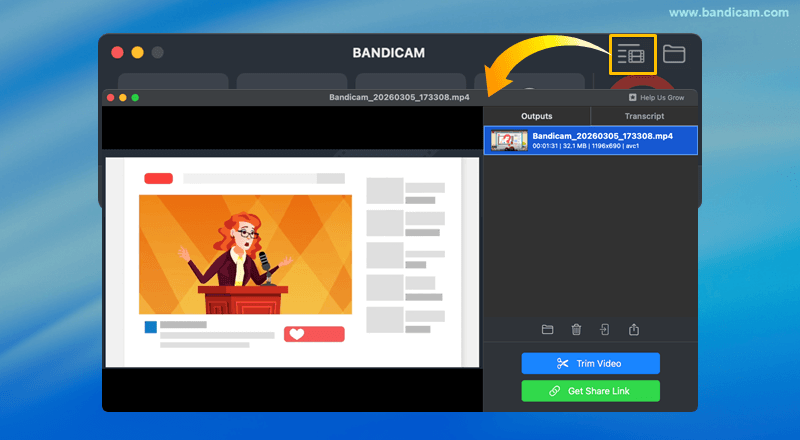
- Go to the Output video list.
Open the Output video list and select the video you want to subtitle.
- Generate subtitles automatically.
Click the Transcript tab after selecting your video. Bandicam will automatically generate a transcript from the video audio, which you can use as subtitles.
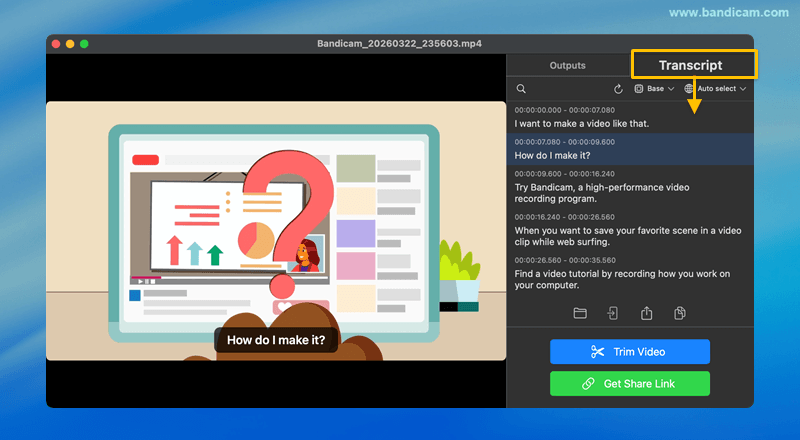
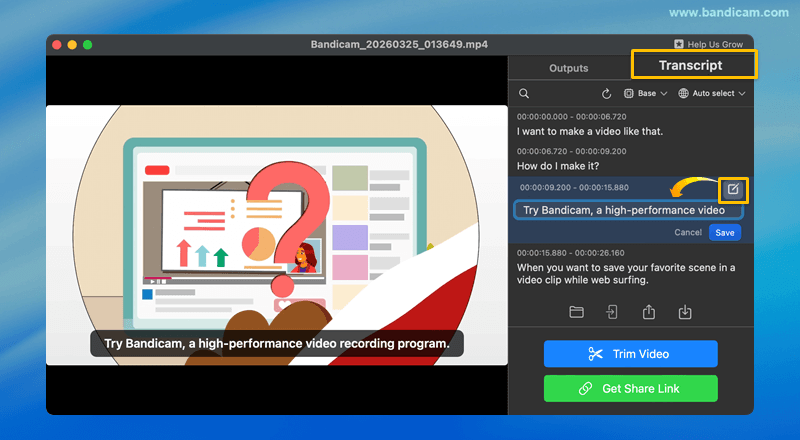
- Review and edit the text.
After the transcript appears, review the text and edit any lines you want to change by clicking the Edit icon.
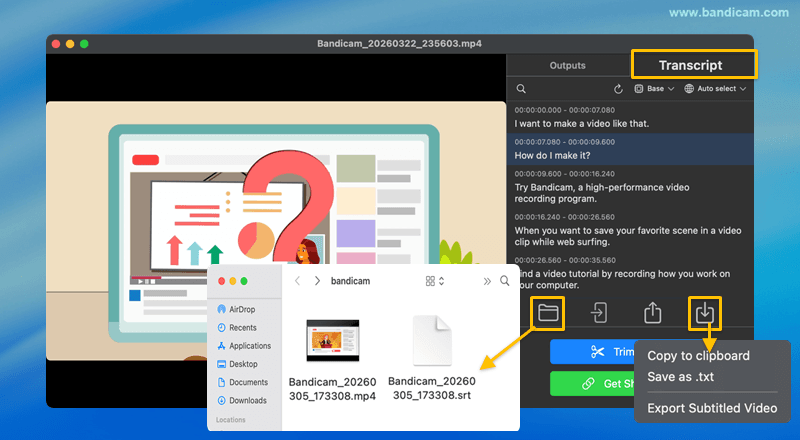
- Save the subtitle file or export the video.
Bandicam automatically creates an SRT file for the video and saves it to the output folder. Click the Download icon to copy the transcript, save it as TXT, or export a subtitled video.
How to Improve Subtitle Accuracy
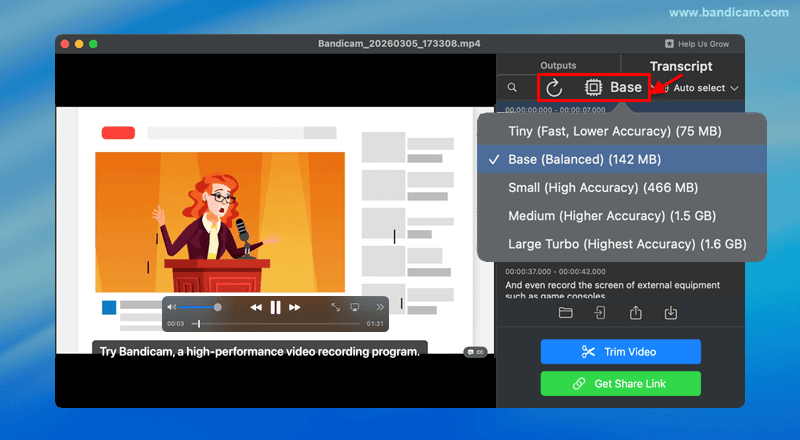
Bandicam uses audio preprocessing by default to reduce background noise and improve transcription results. For even better subtitle accuracy, you can also switch to a larger AI model, select the language manually, and then click the Refresh icon to regenerate the transcript.
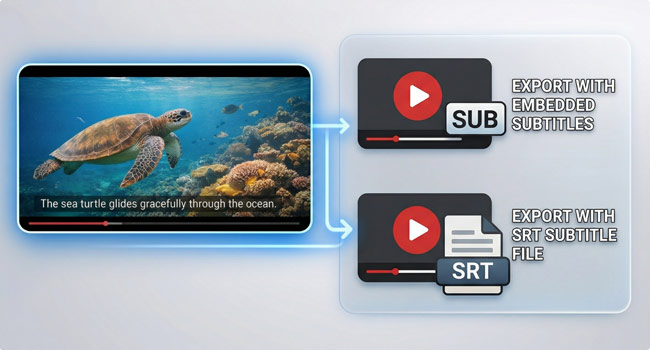
Choose the Right Output Format
The best format depends on how you plan to use the result.
- Choose SRT if you want a subtitle file you can upload separately or edit later.
- Choose TXT if you want the spoken content as plain text for notes, summaries, or meeting records.
- Choose a subtitled video if you want the subtitles already included in the final video.
To learn more about the differences between subtitle formats and related terms, see our guide on video transcript vs captions vs subtitles.
Share or Upload the Finished Video
After adding subtitles, you may want to send the video immediately. Bandicam for Mac lets you quickly share your video through AirDrop, and you can also upload it to Google Drive, Dropbox, or OneDrive. This makes it easier to send the finished video to teammates, clients, students, or collaborators.
Related FAQs
Yes. Bandicam for Mac lets you generate subtitles from a saved Zoom recording, edit the transcript, and save the result as an SRT or TXT file, or export a subtitled video. For more details, read how to transcribe Zoom recordings.
Yes. With a tool like Bandicam for Mac, you can generate subtitles automatically from the video audio, then review and edit the text before saving or exporting the result.
It depends on how you plan to use the result. An SRT file is better if you want a separate subtitle file you can edit or upload later, while a subtitled video is better if you want the subtitles already visible in the final video. In Bandicam for Mac, you can choose the format that best fits your workflow.
Conclusion
If you need to add subtitles to a video on Mac, a simple workflow works best: generate the text, review it, save it in the right format, and share the result. With Bandicam for Mac, you can save subtitles as SRT, save transcripts as TXT, or export a subtitled video depending on your needs.

