
VLC Media Player is one of the most popular video players in the world. Because it can convert files, screen record, and apply basic effects, many people also try to use VLC as a simple video editor—especially for cutting or trimming clips.
In this guide, you’ll learn:
How to Cut Videos with VLC on Windows
The most important thing to know is that VLC doesn’t actually “cut” or “trim” your video in the way you think. It can’t save a part of the original file without re-encoding. Instead, VLC’s method involves recording a new clip from the video as it plays.
Here are the step-by-step instructions:
- Open your video in VLC and go to View > Advanced Controls to enable the red Record button.
- Set your start point using the playhead, and then click Record and Play to begin capturing.
- Let the video play to your desired endpoint, and click Record again to stop.
- Find your saved clip in your Videos folder (e.g., C:\Users\[YourName]\Videos).

That’s it. You now have a new video file containing only the part you recorded. But, as you may have noticed, this method is far from perfect.
By default, VLC usually saves the recorded clip to your Videos folder on Windows. If you don’t see it there:
- Open Tools > Preferences.
- Go to the Input / Codecs section.
- Check your Record directory or filename setting.
How to Trim Videos with VLC on Mac
The process on macOS is very similar, but the interface and menus look slightly different.
- Launch VLC, go to File > Open File…, and select your video.
- Move to the start point, select Playback and click Record in the top menu.
- Let the video play, and then click Record again to stop.
- Check the saved clip in your Movies folder. If it’s not there, check VLC > Settings > Preferences > Input / Codecs for the Record directory.

Common VLC Cut/Trim Problems (and How to Fix Them)
Because VLC is not a true editor, many users run into issues when they try to cut or trim videos. Below are some common problems and what you can do about them.
1. Clip Not Saving or Missing
- Check output folder: Go to VLC > Preferences > Input / Codecs and verify the Record directory
- Update VLC: Older versions may have bugs
- Folder permissions: Save your video to a folder that you can fully control, like Documents or Videos
2. Clip Length Is Incorrect
- Press Record before the part you want to keep
- Avoid skipping or scrubbing the timeline while recording
- Keep playback speed at normal (1x) to avoid timing issues
3. Quality Loss After Cutting
- Use high-quality output settings or preserve the original codec
- Avoid converting the video multiple times
- For lossless trimming, VLC isn’t ideal—use a dedicated video cutter instead
So, what if you want to cut a video instantly, with no quality loss, and with frame-level precision?
Easier Alternative: Cut Videos with Bandicut
If you need to trim videos frequently, using a dedicated video cutter like Bandicut can save you significant time and hassle. Bandicut is built specifically for fast and easy video cutting and joining. One standout feature is its High-Speed Mode, which allows you to trim videos without re-encoding—preserving original quality and speeding up the process compared to tools like VLC.
VLC vs. Bandicut: A Quick Comparison
| Feature | VLC Media Player | Bandicut |
| Cut Method | Re-records | Lossless Cutting |
| Speed | Slow | Extremely Fast |
| Quality | Quality Loss | 100% Original Quality |
| Precision | Low | High (Frame-level precise) |
| Ease of Use | Confusing | Very Easy |
| Merge Clips | No | Yes |
| Batch Cutting | Not supported | Fully supported |
Here’s how to cut or trim videos with Bandicut:
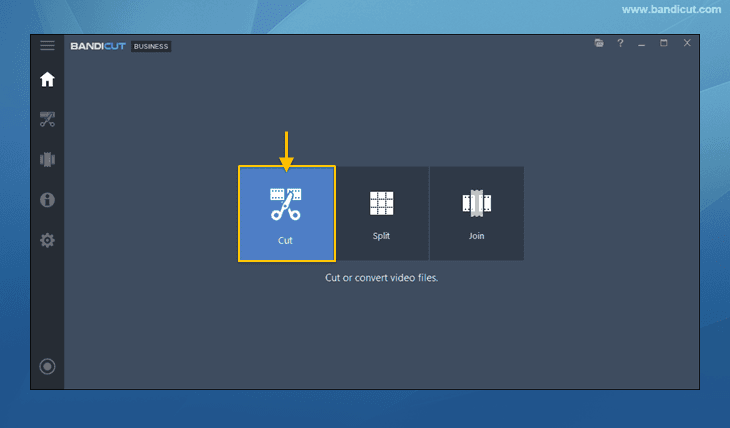
Step 1. Open Bandicut and click the ‘Cut’ button.
Step 2. Select the video you want to cut, and then use the slider to set the start and end points of the clip. Next, click ‘Start.’
You can type in the exact start/end times for perfect, frame-level precision.

Step 3. Choose High-Speed mode. This ensures your video is cut with zero re-encoding and zero quality loss.

Done! The cut is finished in seconds, not minutes. The new file is saved, and the quality is 100% identical to the original.
FAQs
Enable Advanced Controls, move to the start of the section you want to keep, press Record, let the video play, and press Record again at the end point. VLC will save the recorded portion as a new file.
VLC is a fantastic video player with some extra tools, but it’s not a full editor. It lacks a timeline, multiple tracks, and advanced editing features. It’s suitable for very basic cuts, but not for regular or professional editing.
Conclusion
VLC Media Player is undeniably an excellent tool for playback, and its recording feature can serve as a handy workaround for quick, rough clips. However, since it relies on re-recording rather than true editing, it inevitably involves compromises in speed and quality. If you prioritize preserving the original video quality and saving time, a dedicated video cutter like Bandicut may be a more practical solution for you.

